Running modern GNU/Linux on PowerMac G5 - the complete instruction
Posted on by Idorobots
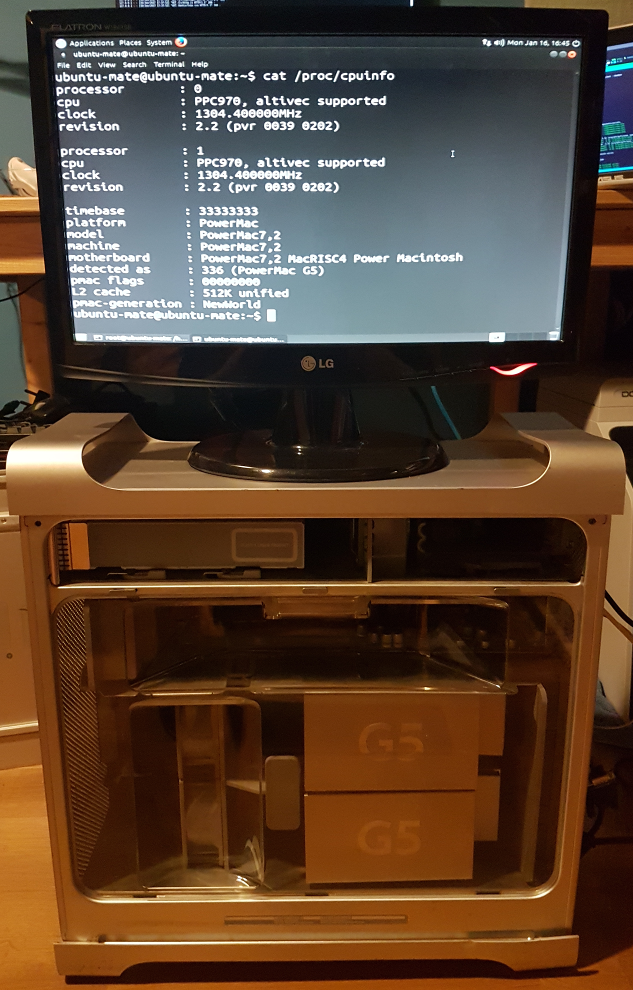
Recently, I had a craving for some PowerPC action, so I dug up an old PPC970-based machine and had some considerable fun playing with it. The machine in question is an early model of double-processor PowerMac G5, version 7.2 to be exact:
I've decided to write this post because these machines are getting old and any sort of info on how to boot GNU/Linux on them is getting sparser by the year. Especially the correct sort. Surprisingly enough, even though Ubuntu has dropped the official support for PowerPC quite early (since 7.04), there's a strong community still maintaining PowerPC ports of the distro & various packages. In fact, you can download a live ISO image of the most recent version (16.10 at the time of writing this post) right off the official Ubuntu downloads page. Pretty neat!
Here's what you're going to need:
- PowerPC-flavored GNU/Linux distribution image of your choice (I used Ubunt 16.04 LTS but these instructions should apply equally to any other distribution),
- a USB pendrive, at least 8 GB in size (more on that later),
- PowerMac G5,
- preferably wired preferably Apple keyboard,
- a compatible display.
Preparation
Start off by downloading an image (let's call it image.img) and burning it onto a pendrive. This varies from platform to platform so unless you're using GNU/Linux you'll have to google. In GNU/Linux you can usedd to do that:# dd if=image.img of=/dev/sdX
The /dev/sdX is the block device assigned to your USB pendrive. You can check which one it is by using lsblk. Be sure to use the correct block device, as Disk Destroyer is named so for a reason. After the image has been burned onto the USB drive, be sure to flush any kernel IO buffers:
# sync
Now you can plug your USB drive in the PowerMac and proceed to the next section.
Boot to Open Firmware
Now here's the fun part - we'll need to boot into the Open Firmware in order to change the boot sequence. This process might be quite random and nerve-racking unless you own an Apple-issued wired keyboard.
For Apple keyboards:
- Boot your machine while holding Command + Option + o + f keys.
- Release the keys once you see the Open Firmware screen.
For non-Apple, non-wired keyboards:
- Boot your machine while holding Windows + Alt + o + f keys.
- Fail to reach the Open Firmware screen several times.
- Try harder.
- Fail to reach the Open Firmware screen.
- Try pressing the combination right after you hear the initial boot up sound.
- Fail to reach the Open Firmware screen a few more times.
- Get awfully discouraged with the whole enterprise.
- Try one last time.
- Try several more times while swearing a lot and randomly pressing and releasing the key combination.
- Release the keys once you see the Open Firmware screen.
If you fall into the first category - congratulations, you can now wear your smug smile until the end of time, otherwise - don't get discouraged too quickly thanks to the following instructions you'll only have to do this once - for me it was more like five or six times.
If you still didn't manage to boot into the Open Firmware consult the Troubleshooting section, otherwise make sure your machine always boots into the Open Firmware:
> setenv auto-boot? false
Verify that you actually set it correctly:
> printenv auto-boot?
Proceed to the next section once you've made sure it prints false.
Prepare the boot device
In order to boot from the live ISO image, we'll need to find the device access path of the USB drive and set it up as the main boot device. That's the part in which most of the articles on the web are wrong.
List the device tree of the machine:
> dev / ls
This will print a rather long device tree of your machine. What your looking for may differ from machine to machine, but in general, scroll with enter until you see an entry with usb string in it. This is the section you're interested in. It list your machine's USB hubs and connected devices - try looking for any name that might represent your USB pendrive, say disk@1 or something similar. In my case it was disk@2 under usb@b,1, in the pci@4 section, so the whole device path is /ht/pci@4/usb@b,1/disk@2. You can verify that this path is correct by issuing the following command:
> dev /ht/pci@4/usb@b,1 ls
It should print out your USB drive's name you found earlier. Now, set up an alias for this device:
> devalias ud /ht/pci@4/usb@b,1/disk@2
Next, configure & verify the main boot device of your machine:
> setenv boot-device ud:,\\:tbxi
> printenv boot-device
And finally, try booting from the USB drive:
> mac-boot
...aaaand if your luck is anything like mine, it won't work. Proceed to the next section.
(In the rare event it actually did work - you're done. You can set auto-boot? back to true now.)
Troubleshooting
If you did not reach the Open Firmware step - tough luck. Try getting another keyboard and verifying that your machine is actually working correctly - if there's a red led lit (or flashing) on the main board you might have a hardware issue... Unless you left your machine's mainboard compartment open (without the translucent polycarb air guide). It won't boot without it. You did know that, didn't you?
If you did reach the Open Firmware step... Congratulations! You're doing good - you've managed to boot into the Open Firmware and set up the boot device, but it appears not to be working. The fix is surprisingly simple - try swapping the USB port you plug your USB drive into and updating the devalias ud accordingly until it works. For me, the final working path was /ht/pci@4/usb@b/disk@1. If it still doesn't work make sure your USB pendrive is at least 8 GB in size - I didn't manage to boot from any device smaller than that - as Open Firmware appears to require that. It might as well be USB manufacturer related.
¯\_(ツ)_/¯
Benchmarks
So now that we finally booted GNU/Linux on the PowerMac G5, we can do some apples to oranges [pun intended] benchmark comparisons between:
- PowerMac - 2 GHz, 2-core PowerPC 970 made in 2003,
- RaspberryPi 2 model B - 4-core 0.9 GHz BCM2709 made in 2015,
- ASUS UX501V - 3.5 GHz, 8-thread, 4-core i7-6700HQ made in 2015.
(All collected data is available here.)
Here are some results - bogo-operations per second normalized against the most performant machine:
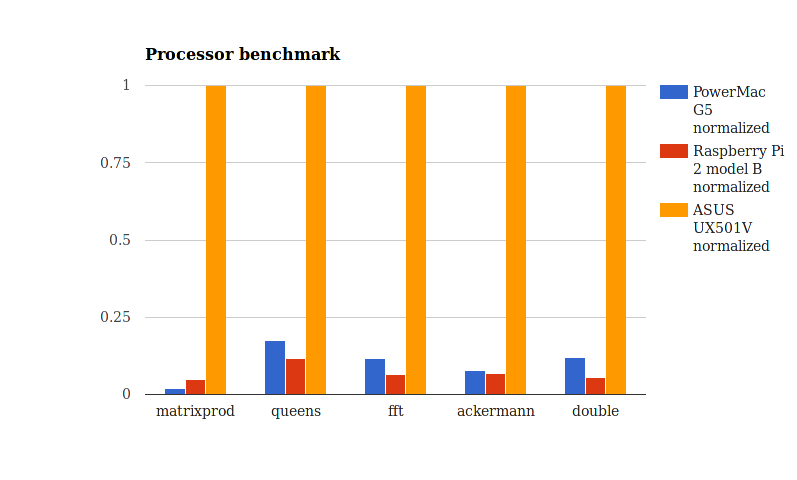
Surprisingly enough, the PowerMac G5 holds up pretty well even though it's nearing its fifteenth birthday. It beats the Raspberry Pi 2 in most of the benchmarks being twice as fast even though it only has two processor cores, as compared to four on the Raspberry Pi. Obviously neither Raspberry Pi 2 nor the PowerMac G5 are a match for the i7 processor, but on some of the benchmarks (queens and fft) the i7 is merely 6-8 times faster than the PowerPC 970. Pretty decent performance.